> ## Documentation Index
> Fetch the complete documentation index at: https://docs.withsurface.com/llms.txt
> Use this file to discover all available pages before exploring further.
# Step 1: Webhook Trigger Campaigns
> Create two webhook-triggered campaigns in Customer.io—one for partial submissions and one for completed—each with its own URL
In this step, you'll create **two webhook-triggered campaigns** in Customer.io—one for **Dropped Off** (partial) submissions and one for **Form Submission** (completed). Each campaign has its own webhook URL, so Surface sends to the right URL based on the trigger path. No need to pass `submission_type` in the payload.
## Create the First Webhook Campaign (Partial / Dropped Off)
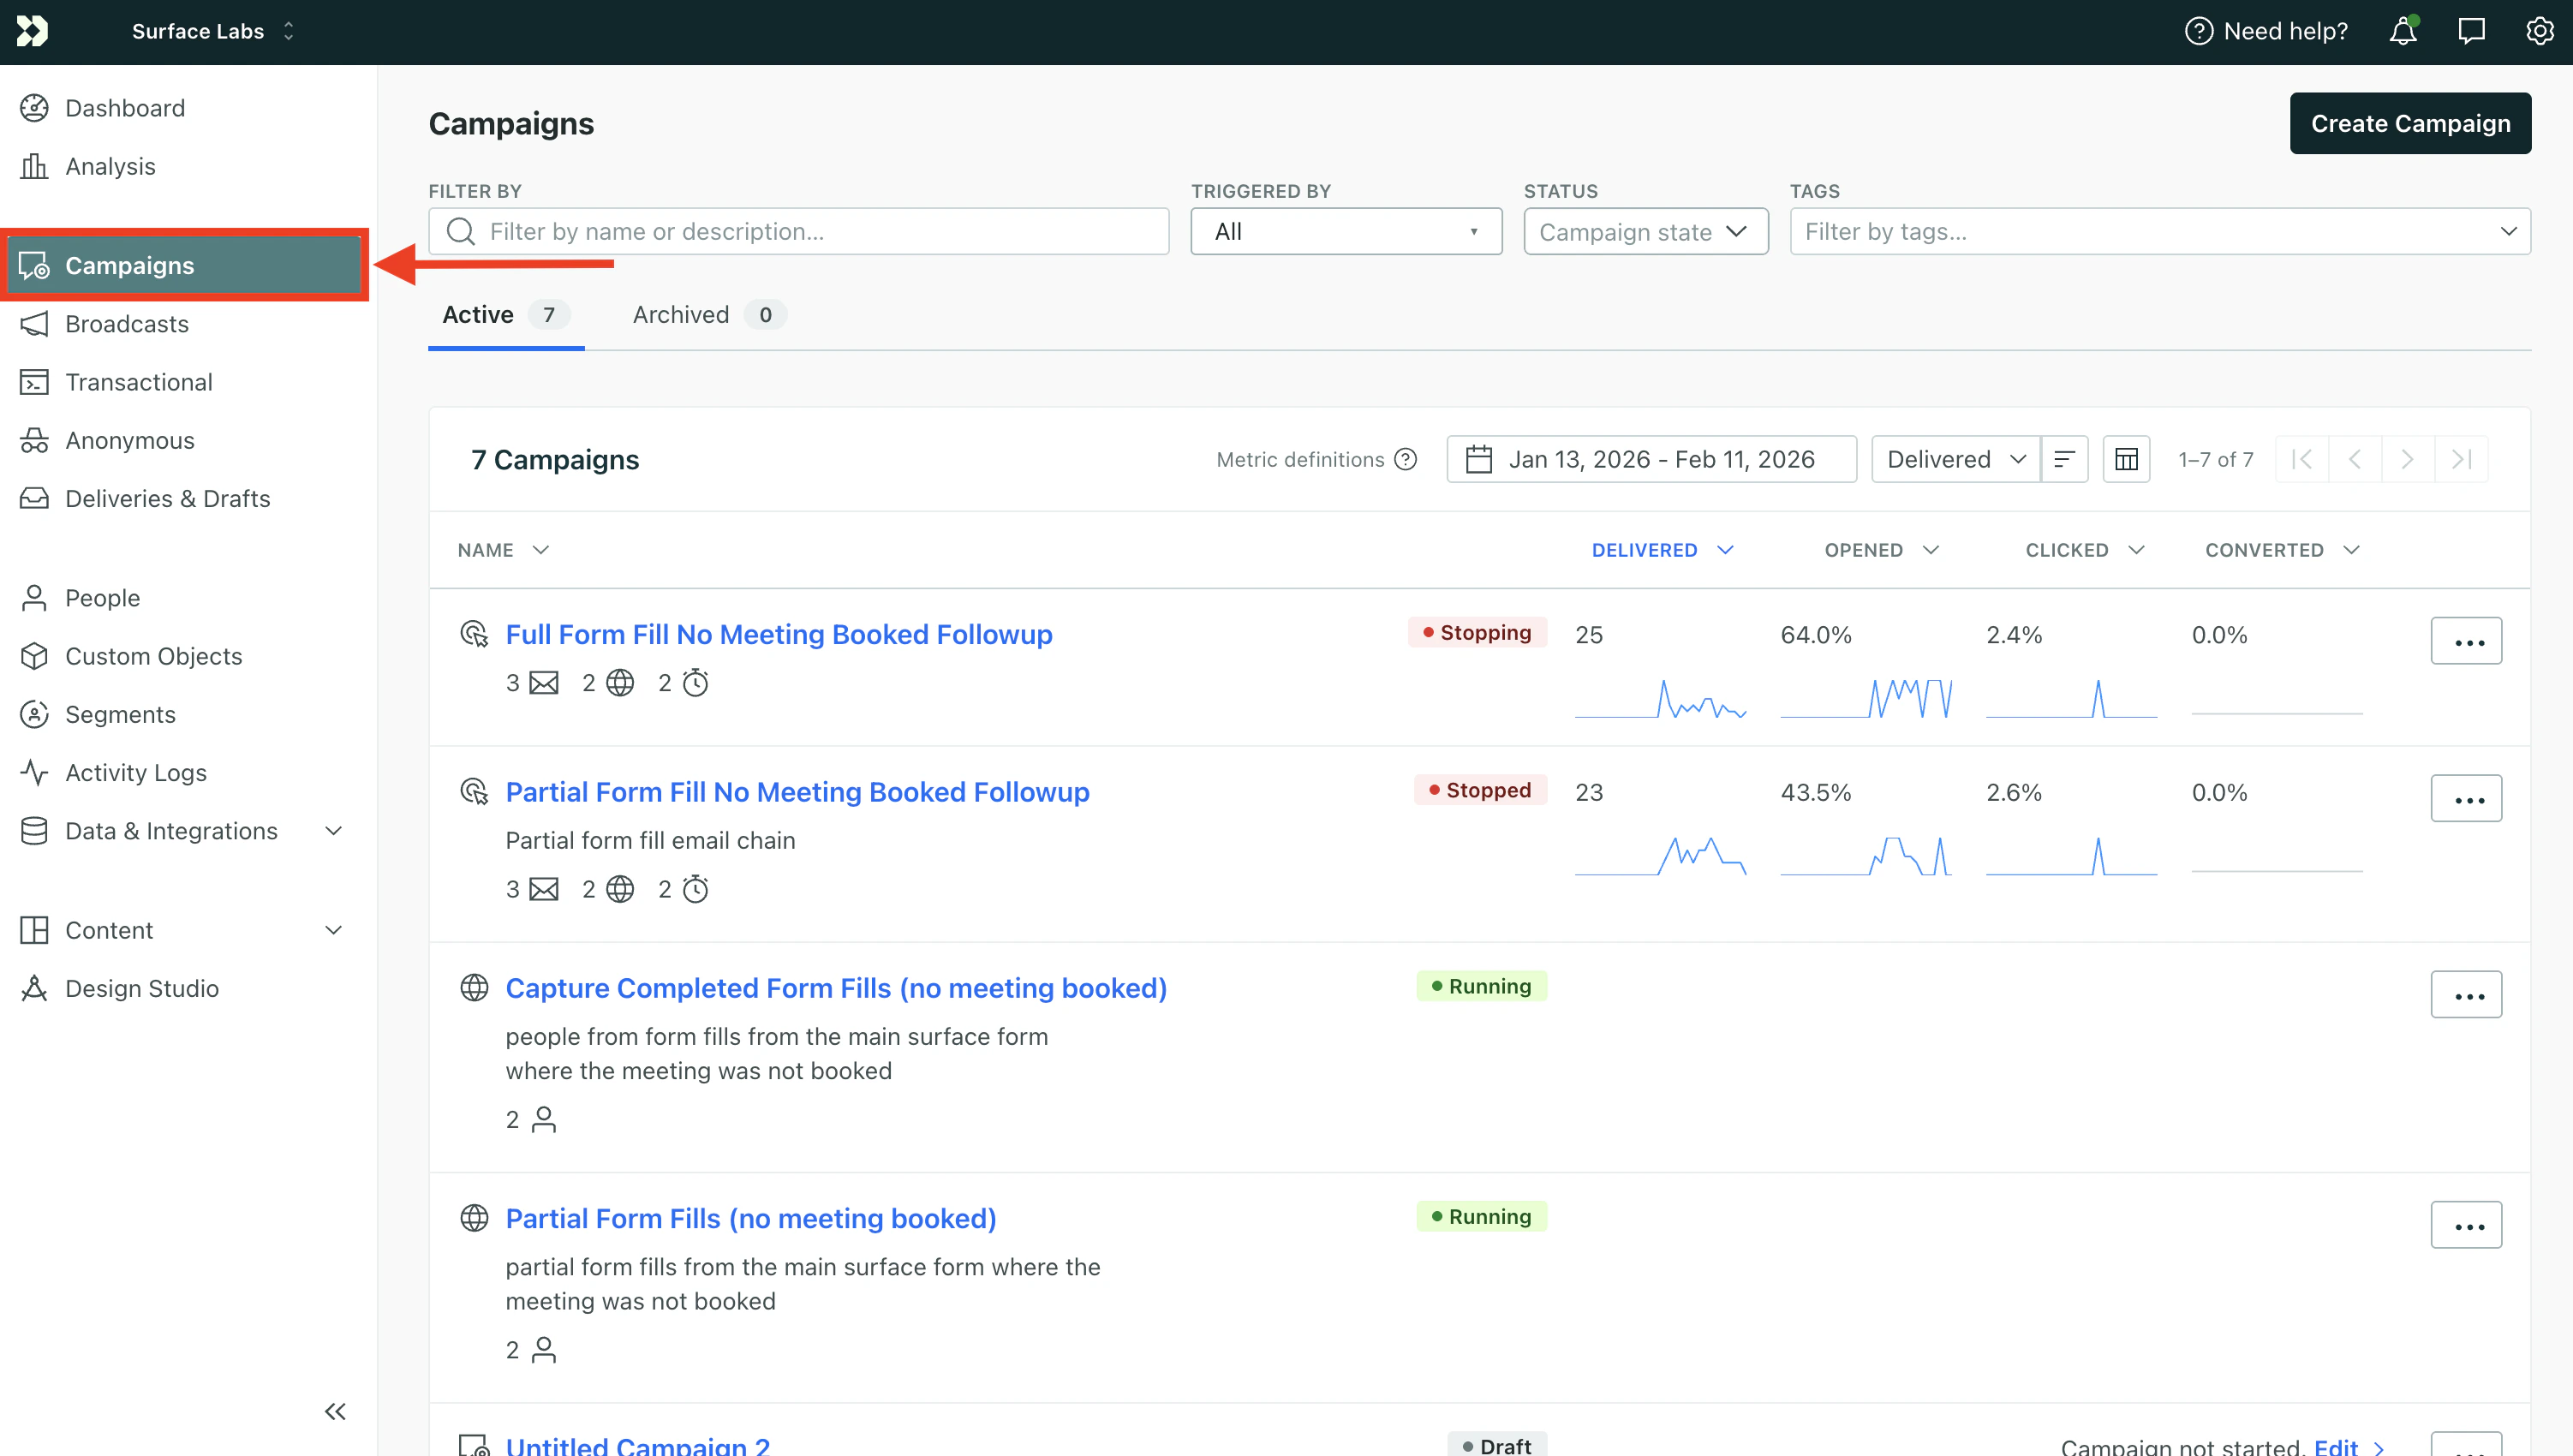 1. In Customer.io, go to **Campaigns** and click **Create Campaign**
2. Click **Webhook** as the trigger type
3. Copy the **Webhook URL**—you'll use this for the **Dropped Off** path in [Step 2](/guides/email-sequences-customerio-calendly/step-2-surface-workflow)
4. Click **Save & Next**
### Set Up the Workflow
Add two actions to this campaign:
1. **Create or Update Person** — so the lead exists in Customer.io
2. **Send Event** — so your partial-submission email campaign can start
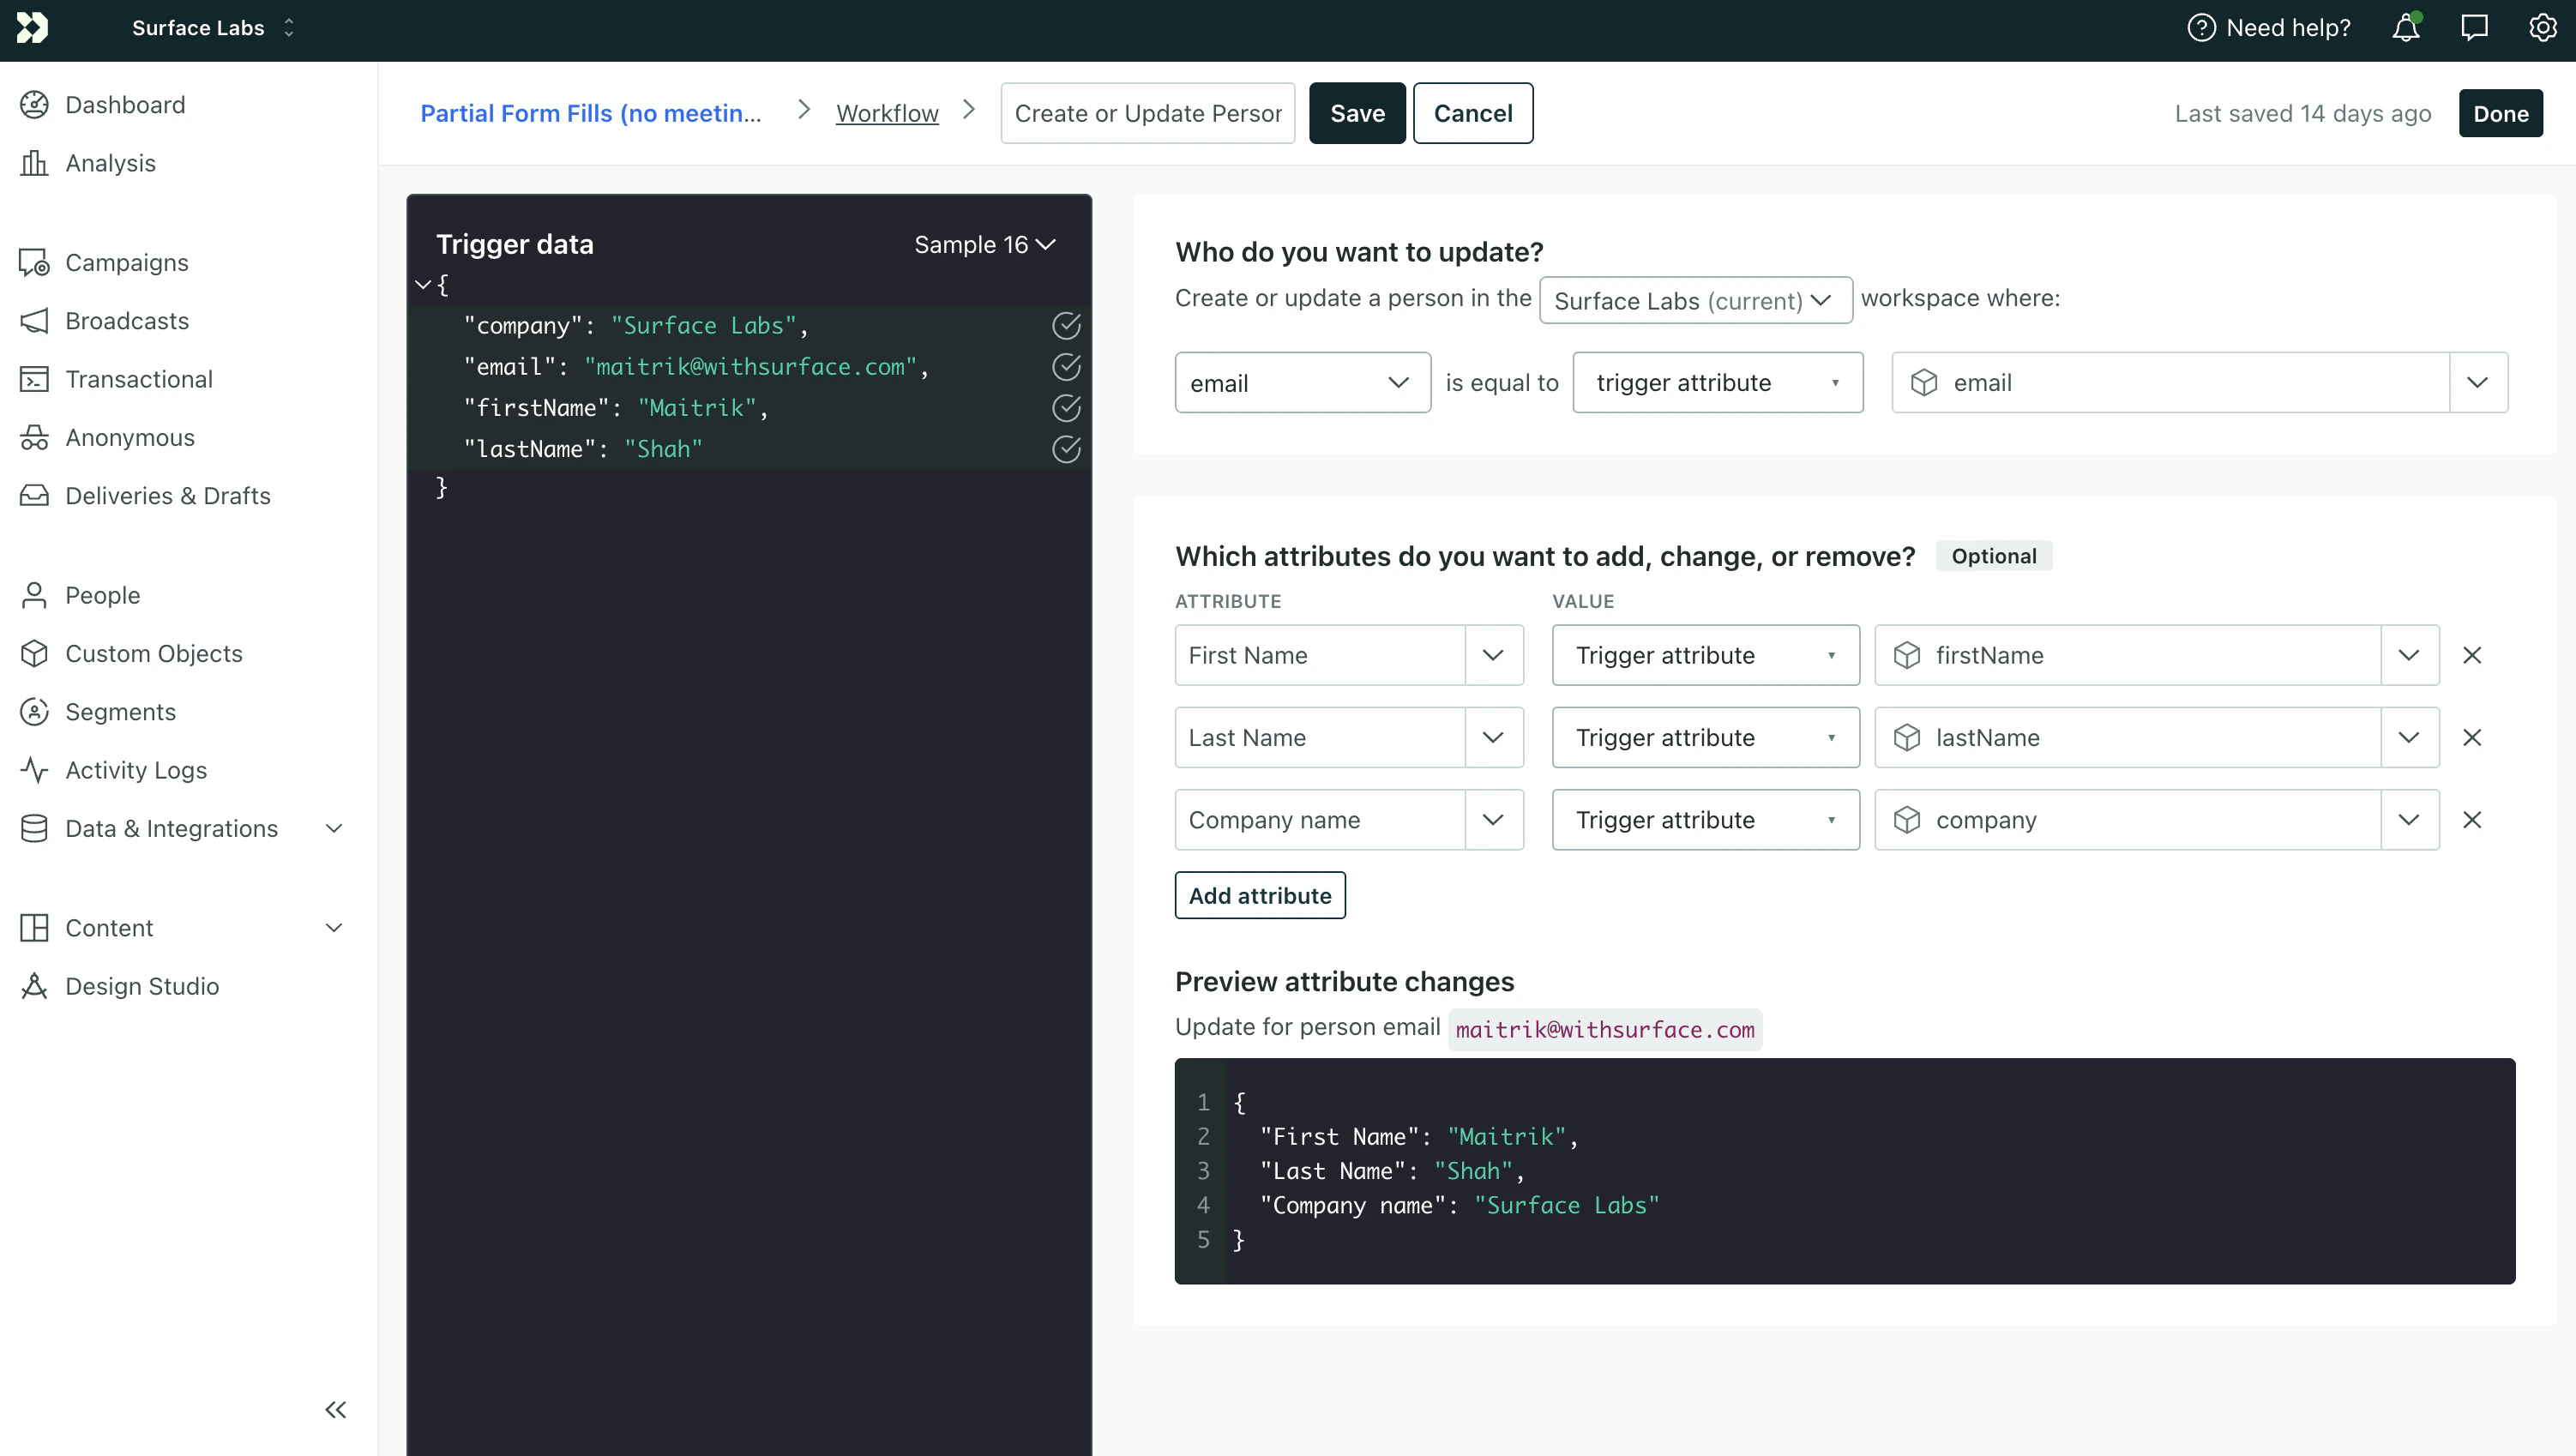
#### Add "Create or Update Person"
1. Drag **Create or Update Person** into the workflow
2. Give it a name (e.g., "Create/Update Lead")
3. Configure the action:
* **Workspace**: Select the workspace where you want to store leads
* **Identifier**: Use `email` (or another field from your Surface form that uniquely identifies the lead)
* **Identifier value**: Map to `trigger.email` (or the equivalent key from your webhook payload)
* **Attributes**: Add any additional attributes you want to store (e.g., `firstName`, `lastName`)
1. In Customer.io, go to **Campaigns** and click **Create Campaign**
2. Click **Webhook** as the trigger type
3. Copy the **Webhook URL**—you'll use this for the **Dropped Off** path in [Step 2](/guides/email-sequences-customerio-calendly/step-2-surface-workflow)
4. Click **Save & Next**
### Set Up the Workflow
Add two actions to this campaign:
1. **Create or Update Person** — so the lead exists in Customer.io
2. **Send Event** — so your partial-submission email campaign can start
#### Add "Create or Update Person"
1. Drag **Create or Update Person** into the workflow
2. Give it a name (e.g., "Create/Update Lead")
3. Configure the action:
* **Workspace**: Select the workspace where you want to store leads
* **Identifier**: Use `email` (or another field from your Surface form that uniquely identifies the lead)
* **Identifier value**: Map to `trigger.email` (or the equivalent key from your webhook payload)
* **Attributes**: Add any additional attributes you want to store (e.g., `firstName`, `lastName`)
 #### Add "Send Event"
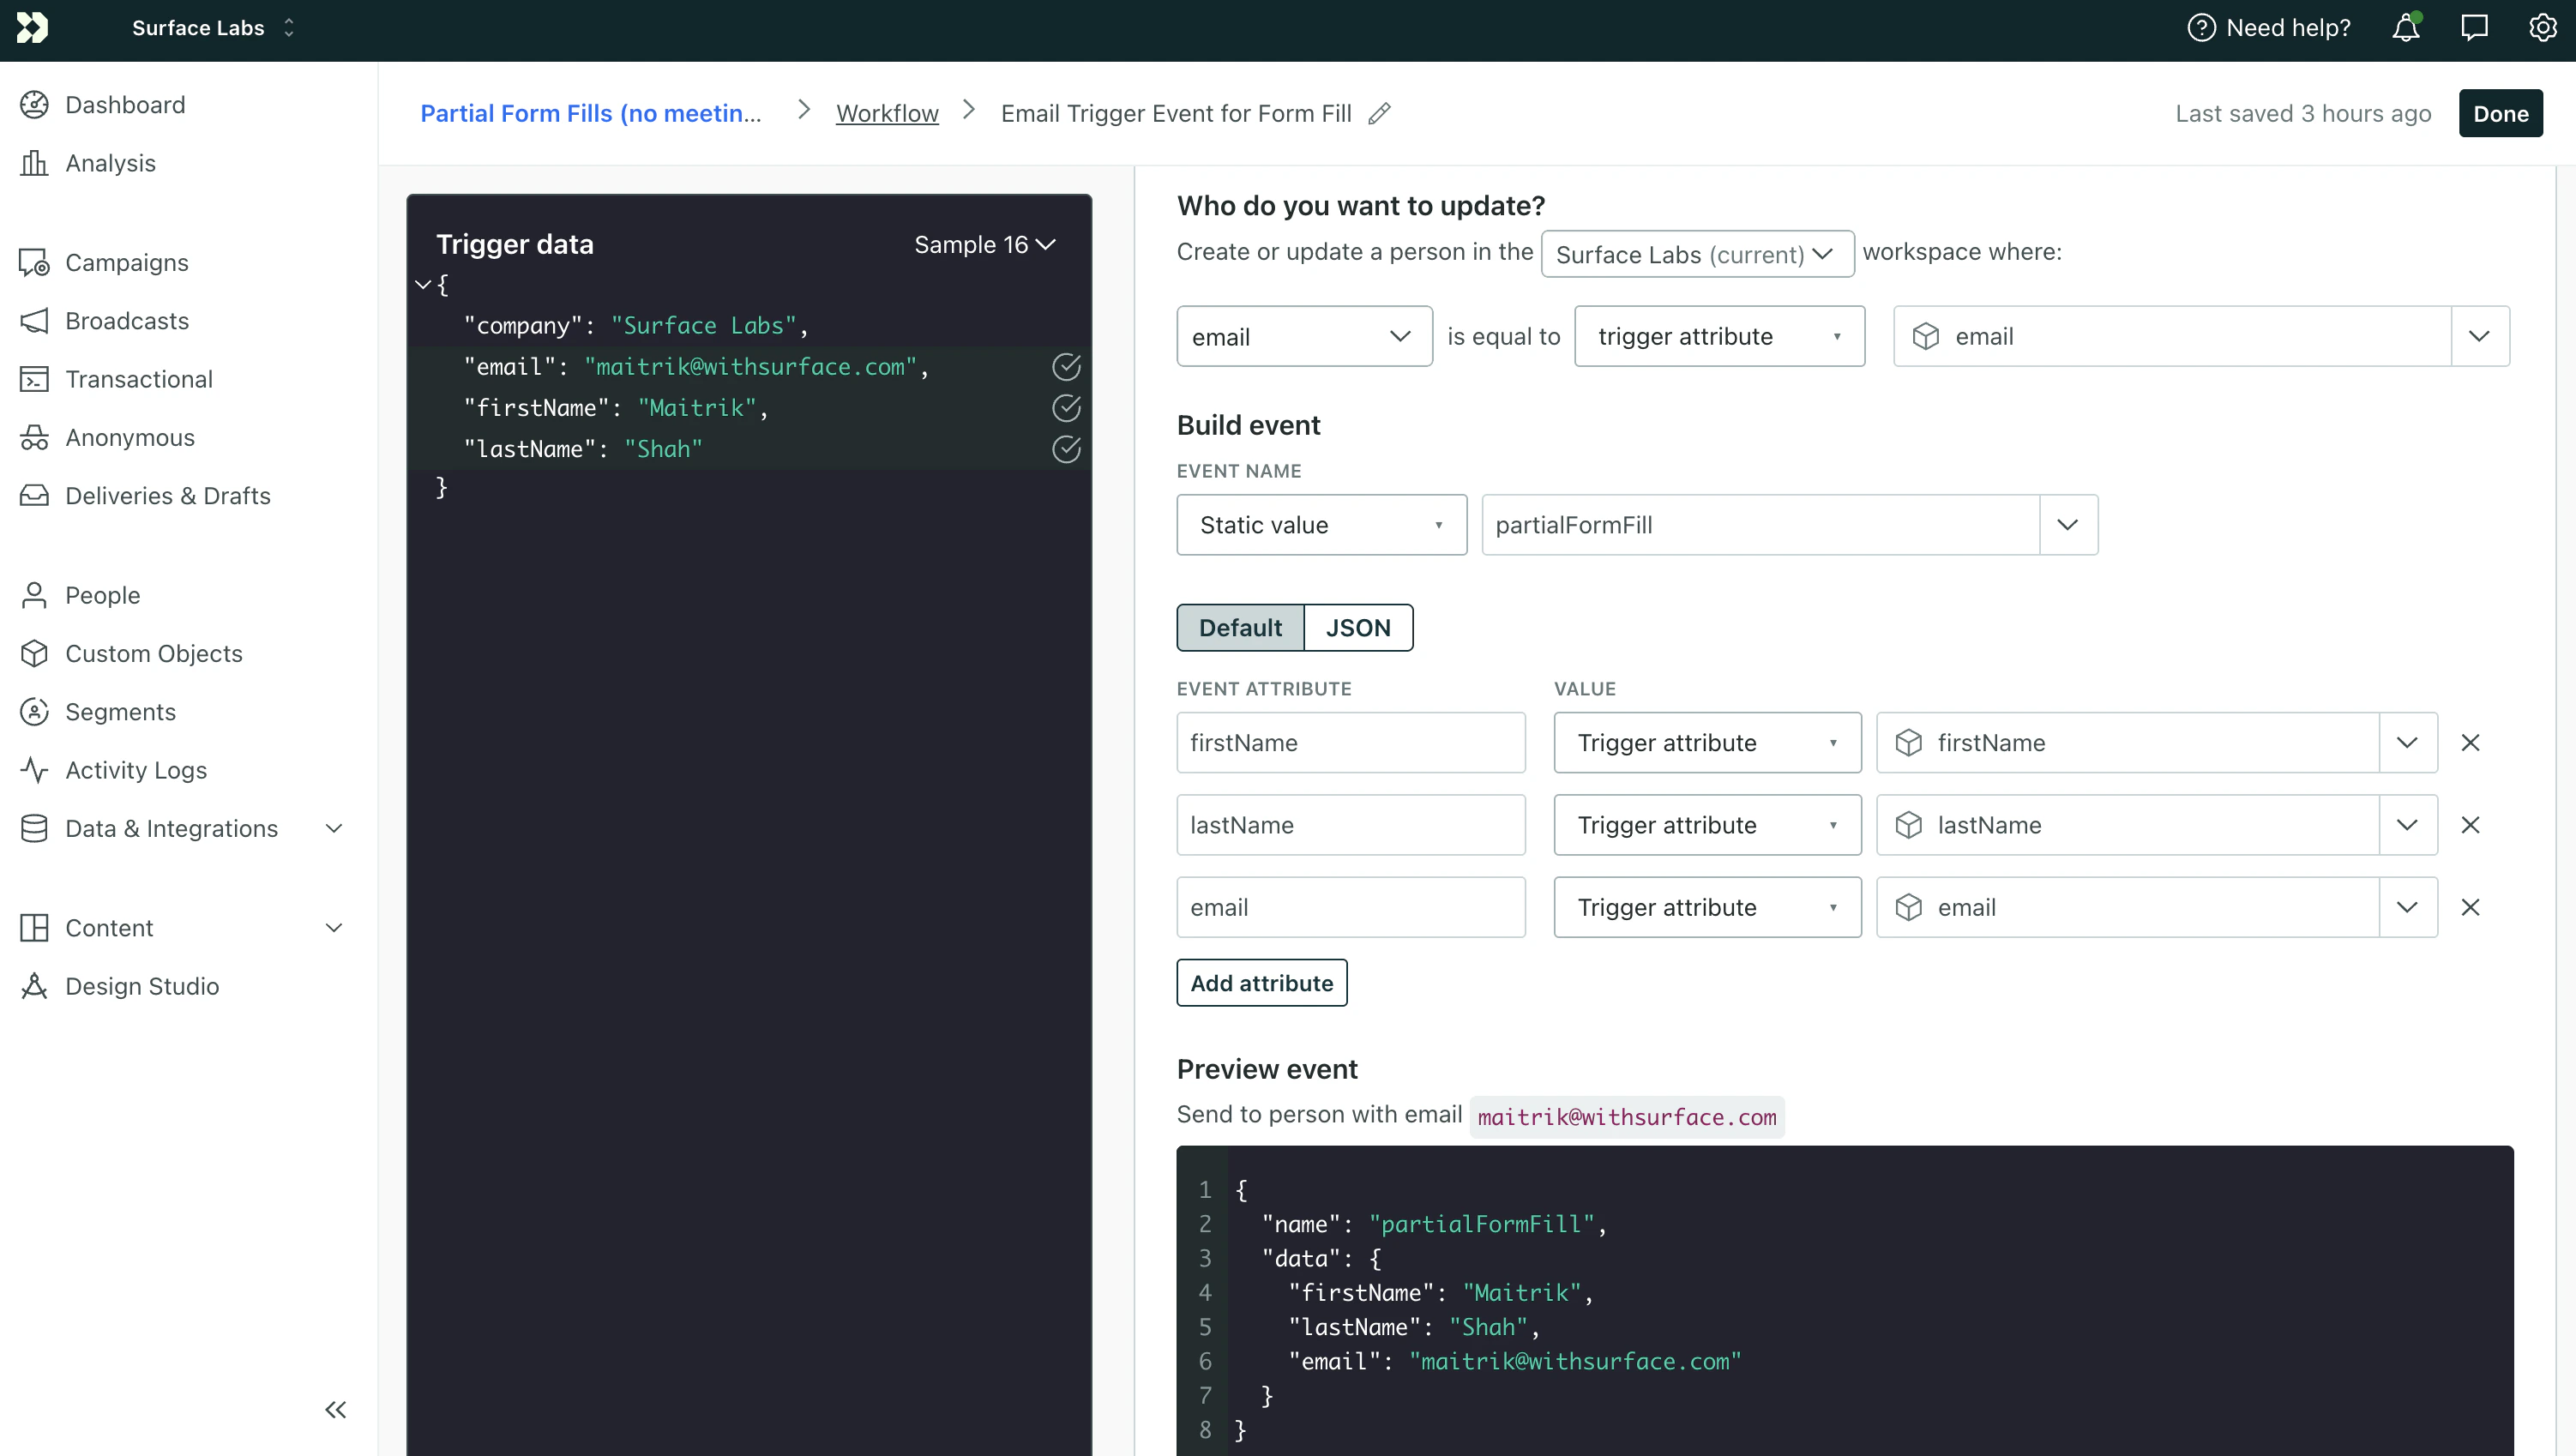 1. Drag **Send Event** into the workflow (after Create or Update Person)
2. Give it a name (e.g., "Partial Form Fills")
3. Configure the event:
* **Who do you want to update?**: Select the same workspace
* **Identifier**: Use `email` (or match your Create or Update Person identifier)
* **Identifier value**: Map to `trigger.email`
* **Event Name**: Use `partialFormFilled` (you'll use this in your event-triggered campaign in Step 3)
Use the `trigger` object to reference incoming webhook data. For example,
`trigger.email`, `trigger.firstName`, or `trigger.lastName`. The exact keys
depend on the payload you send from Surface.
4. Click **Next** to review, then **Start Campaign**
5. **Save the Webhook URL** for the Dropped Off path
## Create the Second Webhook Campaign (Completed / Form Submission)
Repeat the same process for completed submissions:
1. Create a **new** webhook campaign
2. Copy the **Webhook URL**—you'll use this for the **Form Submission** path in Step 2
3. Add **Create or Update Person** (same configuration as above)
4. Add **Send Event** with **Event Name**: `formCompleted`
5. Start the campaign and save the Webhook URL for the Form Submission path
You now have **two webhook URLs**—one for partial, one for completed. Surface will send to the appropriate URL based on whether the lead dropped off or completed the form.
## Next Step
Configure your Surface workflow to send form data to the correct Customer.io webhook URL based on the trigger path. See [Step 2: Configure Surface Workflow](/guides/email-sequences-customerio-calendly/step-2-surface-workflow).
1. Drag **Send Event** into the workflow (after Create or Update Person)
2. Give it a name (e.g., "Partial Form Fills")
3. Configure the event:
* **Who do you want to update?**: Select the same workspace
* **Identifier**: Use `email` (or match your Create or Update Person identifier)
* **Identifier value**: Map to `trigger.email`
* **Event Name**: Use `partialFormFilled` (you'll use this in your event-triggered campaign in Step 3)
Use the `trigger` object to reference incoming webhook data. For example,
`trigger.email`, `trigger.firstName`, or `trigger.lastName`. The exact keys
depend on the payload you send from Surface.
4. Click **Next** to review, then **Start Campaign**
5. **Save the Webhook URL** for the Dropped Off path
## Create the Second Webhook Campaign (Completed / Form Submission)
Repeat the same process for completed submissions:
1. Create a **new** webhook campaign
2. Copy the **Webhook URL**—you'll use this for the **Form Submission** path in Step 2
3. Add **Create or Update Person** (same configuration as above)
4. Add **Send Event** with **Event Name**: `formCompleted`
5. Start the campaign and save the Webhook URL for the Form Submission path
You now have **two webhook URLs**—one for partial, one for completed. Surface will send to the appropriate URL based on whether the lead dropped off or completed the form.
## Next Step
Configure your Surface workflow to send form data to the correct Customer.io webhook URL based on the trigger path. See [Step 2: Configure Surface Workflow](/guides/email-sequences-customerio-calendly/step-2-surface-workflow).